Your Own Private Internet with Nanocl and WireGuard
· leone
Want blazing-fast, ultra-secure access to your private network from anywhere in the world? Tired of relying on third-party VPNs? With WireGuard and Nanocl, you can launch your own VPN server in minutes no advanced sysadmin skills required!
In this guide, you’ll learn how to:
- Set up a WireGuard VPN server on any Linux machine
- Use Docker and Nanocl for easy, reliable deployment
- Securely connect to your internal services from anywhere
In short, Nanocl + WireGuard gives you a clean way to publish and discover internal services securely, with minimal ops overhead.
Let’s get started and take control of your privacy!
Prerequisites
- A Linux server with a public IP address
- This server will host your WireGuard VPN and be your secure gateway.
- Docker installed
- Docker lets you run services in isolated containers.
- Nanocl installed
- Nanocl makes container orchestration simple and comes with a built-in proxy and DNS server.
Install Docker
Follow the official Docker installation guide for your Linux distribution. It’s quick and easy!
Install Nanocl
Download and install the Nanocl CLI binary with this simple command:
curl -fsSL https://download.next-hat.com/scripts/get-nanocl.sh | shThen create a Nanocl group and install Nanocl’s internal services:
sudo groupadd nanocl
sudo usermod -aG nanocl $USER
newgrp nanocl
nanocl install
Deploy WireGuard (Your Private VPN)
Now for the fun part! We’ll use the popular linuxserver/wireguard image.
A preconfigured Statefile is available on our nanocl repository
It retrieves the users you want to create from environment variables.
You can create a .env file with the following content:
WG_USERS=myuserYou can add multiple users separated by commas:
WG_USERS=user1,user2,user3Save the 0.18 Statefile below as wireguard.yml, then apply it with:
WG_USERS=myuser nanocl state apply -s ./wireguard.ymlThe manual for this Statefile is available with:
nanocl state man -s ./wireguard.ymlThe content of the file is as follows:
ApiVersion: v0.18

Args:
- Name: namespace
  Kind: String
  Default: wireguard
- Name: puid
  Kind: String
  Default: 1000
- Name: pgid
  Kind: String
  Default: 1000
- Name: dns
  Kind: String
  Default: "1.1.1.1"
- Name: config-path
  Kind: String
  Default: /opt/containers/wireguard

Namespace: ${{ Args.namespace }}

Cargoes:
- Name: wgsrv
  PortBindings:
    51820/udp:
    - HostPort: "51820"
  Dns:
  # Nanocl replaces $$INTERNAL_GATEWAY with the selected network gateway.
  - $$INTERNAL_GATEWAY
  - ${{ Args.dns }}
  Containers:
  - Name: wireguard
    Image: lscr.io/linuxserver/wireguard:latest
    Cmd:
    - -c
    - SERVERURL=$NANOCL_NODE_ADDR sh /init
    Env:
    - PUID=${{ Args.puid }}
    - PGID=${{ Args.pgid }}
    # Set this to your desired users, they will be created automatically
    # When the container start
    # You can add multiple users separated by comma
    - PEERS=${{ Envs.WG_USERS }}
    - PERSISTENTKEEPALIVE_PEERS=all
    HostConfig:
      CapAdd:
      - NET_ADMIN
      Binds:
      -  ${{ Args.config-path }}/config:/config
      Sysctls:
        net.ipv4.ip_forward: "1"
You can customize the namespace, PUID, PGID, DNS server, and config path by passing them as arguments for example:
WG_USERS=myuser nanocl state apply -s ./wireguard.yml -- --config-path /my/custom/path --puid 1001 --pgid 1001 --dns 8.8.8.8To get your WireGuard client config, run:
cat /opt/containers/wireguard/config/myuser/myuser.confSample config:
[Interface]
Address = 10.13.13.2
PrivateKey = 4Kgkxcu27g9s69OSYmSbh6jmvu8kCC8h12XxqrI3uH4=
ListenPort = 51820
DNS = 10.13.13.1

[Peer]
PublicKey = O/xFv4cFdrSok+Ujm9r5J6Laf1PcQv0A4u2T8BWQBQ8=
PresharedKey = ZOKnf2Zp30WVuTYgcFO7M0QH5C0c3/XTYqCevC69vOg=
Endpoint = 92.161.136.52:51820
AllowedIPs = 0.0.0.0/0, ::/0
Use this configuration file to connect to your WireGuard server
from any device (Windows, Mac, Linux, mobile) using the official WireGuard client.
Deploy internal services
You can now deploy your internal services using Nanocl.
They will be accessible through the WireGuard VPN.
For example, we will deploy a simple service that returns HTTP headers.
ApiVersion: v0.18

Namespace: global

Cargoes:
- Name: deploy-example
  Containers:
  - Name: web
    Image: ghcr.io/next-hat/nanocl-get-started:latest
    Env:
    - APP=EXAMPLE

Resources:
- Name: dns.my-domain.internal
  Kind: ncdns.io/rule/v0.10
  Data:
    Network: Internal
    Entries:
    - Name: my-domain.internal
      IpAddress: Internal

- Name: my-domain.internal
  Kind: ncproxy.io/rule/v0.15
  Data:
    Rules:
    - Domain: my-domain.internal
      Network: Internal
      Locations:
      - Path: /
        Target:
          Key: global.deploy-example.c
          Port: 9000
Once connected to your VPN you can now browse http://my-domain.internal

Security Best Practices
- Restrict UDP port 51820 to trusted IPs using your firewall.
- Keep your private keys secret never share them!
- Regularly update Docker, Nanocl, and WireGuard images.
- Monitor server logs for suspicious activity.
Troubleshooting Tips
- If the WireGuard container won’t start, check Nanocl logs for errors.
- Make sure your firewall allows UDP traffic on port 51820.
- Verify the config path exists and is writable.
- Use
nanocl psandnanocl cargo list --namespace your_namespaceto check running instances.
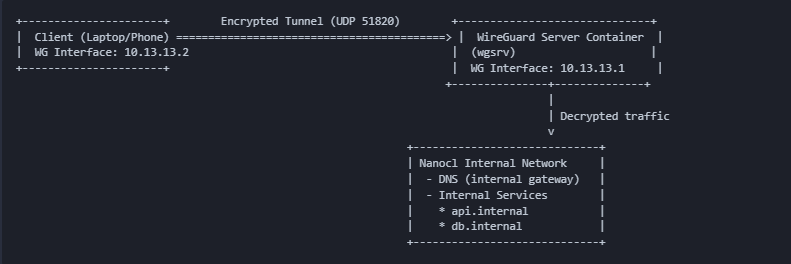
Visualize Your Setup
Next Steps & Call to Action
You did it! You now have your own high-performance VPN server. Share this guide with friends, tweet your success, and help others take control of their privacy!