使用 Nanocl 和 WireGuard 构建自己的私有互联网
· leone
想从世界任何地方高速、安全地访问自己的私有网络?不想依赖第三方 VPN?结合 WireGuard 和 Nanocl,几分钟即可启动自己的 VPN 服务器,无需高级系统管理技能!
本指南介绍如何:
- 在任意 Linux 机器上配置 WireGuard VPN 服务器
- 使用 Docker 和 Nanocl 轻松、可靠地部署
- 从任何地方安全连接内部服务
Nanocl 与 WireGuard 结合,可以以较少运维开销安全发布和发现内部服务。
现在开始,掌握自己的隐私!
前提条件
- 具有公网 IP 地址的 Linux 服务器
- 服务器托管 WireGuard VPN,作为安全网关。
- 已安装 Docker
- Docker 让服务在隔离容器中运行。
- 已安装 Nanocl
- Nanocl 简化容器编排,并内置代理和 DNS 服务器。
安装 Docker
按照你的 Linux 发行版对应的 Docker 官方安装指南 操作,步骤简单快捷。
安装 Nanocl
用下面的简单命令下载并安装 Nanocl CLI 二进制文件:
curl -fsSL https://download.next-hat.com/scripts/get-nanocl.sh | sh然后创建 Nanocl 用户组并安装内部服务:
sudo groupadd nanocl
sudo usermod -aG nanocl $USER
newgrp nanocl
nanocl install
部署 WireGuard(你的私有 VPN)
我们使用广泛采用的 linuxserver/wireguard 镜像。
我们的 Nanocl 仓库 提供了预配置 Statefile。
它从环境变量中读取要创建的用户。
你可以创建如下内容的 .env 文件:
WG_USERS=myuser多个用户用逗号分隔:
WG_USERS=user1,user2,user3将下面的 0.18 Statefile 保存为 wireguard.yml,然后运行:
WG_USERS=myuser nanocl state apply -s ./wireguard.yml使用以下命令查看这个 Statefile 的手册:
nanocl state man -s ./wireguard.yml文件内容如下:
ApiVersion: v0.18

Args:
- Name: namespace
  Kind: String
  Default: wireguard
- Name: puid
  Kind: String
  Default: 1000
- Name: pgid
  Kind: String
  Default: 1000
- Name: dns
  Kind: String
  Default: "1.1.1.1"
- Name: config-path
  Kind: String
  Default: /opt/containers/wireguard

Namespace: ${{ Args.namespace }}

Cargoes:
- Name: wgsrv
  PortBindings:
    51820/udp:
    - HostPort: "51820"
  Dns:
  # Nanocl replaces $$INTERNAL_GATEWAY with the selected network gateway.
  - $$INTERNAL_GATEWAY
  - ${{ Args.dns }}
  Containers:
  - Name: wireguard
    Image: lscr.io/linuxserver/wireguard:latest
    Cmd:
    - -c
    - SERVERURL=$NANOCL_NODE_ADDR sh /init
    Env:
    - PUID=${{ Args.puid }}
    - PGID=${{ Args.pgid }}
    # Set this to your desired users, they will be created automatically
    # When the container start
    # You can add multiple users separated by comma
    - PEERS=${{ Envs.WG_USERS }}
    - PERSISTENTKEEPALIVE_PEERS=all
    HostConfig:
      CapAdd:
      - NET_ADMIN
      Binds:
      -  ${{ Args.config-path }}/config:/config
      Sysctls:
        net.ipv4.ip_forward: "1"
可以通过参数自定义命名空间、PUID、PGID、DNS 服务器和配置路径,例如:
WG_USERS=myuser nanocl state apply -s ./wireguard.yml -- --config-path /my/custom/path --puid 1001 --pgid 1001 --dns 8.8.8.8要获取 WireGuard 客户端配置,运行:
cat /opt/containers/wireguard/config/myuser/myuser.conf配置示例:
[Interface]
Address = 10.13.13.2
PrivateKey = 4Kgkxcu27g9s69OSYmSbh6jmvu8kCC8h12XxqrI3uH4=
ListenPort = 51820
DNS = 10.13.13.1

[Peer]
PublicKey = O/xFv4cFdrSok+Ujm9r5J6Laf1PcQv0A4u2T8BWQBQ8=
PresharedKey = ZOKnf2Zp30WVuTYgcFO7M0QH5C0c3/XTYqCevC69vOg=
Endpoint = 92.161.136.52:51820
AllowedIPs = 0.0.0.0/0, ::/0
使用这份配置文件,即可通过官方 WireGuard 客户端,在任意设备(Windows、Mac、Linux 或移动设备)连接服务器。
部署内部服务
现在可以用 Nanocl 部署内部服务。
这些服务通过 WireGuard VPN 访问。
下面部署一个返回 HTTP 请求头的简单服务。
ApiVersion: v0.18

Namespace: global

Cargoes:
- Name: deploy-example
  Containers:
  - Name: web
    Image: ghcr.io/next-hat/nanocl-get-started:latest
    Env:
    - APP=EXAMPLE

Resources:
- Name: dns.my-domain.internal
  Kind: ncdns.io/rule/v0.10
  Data:
    Network: Internal
    Entries:
    - Name: my-domain.internal
      IpAddress: Internal

- Name: my-domain.internal
  Kind: ncproxy.io/rule/v0.15
  Data:
    Rules:
    - Domain: my-domain.internal
      Network: Internal
      Locations:
      - Path: /
        Target:
          Key: global.deploy-example.c
          Port: 9000
连接 VPN 后,即可访问 http://my-domain.internal 。

安全最佳实践
- 使用防火墙将 UDP 51820 端口限制为可信 IP。
- 妥善保管私钥,绝不共享!
- 定期更新 Docker、Nanocl 和 WireGuard 镜像。
- 监控服务器日志,排查可疑活动。
故障排查
- WireGuard 容器无法启动时,检查 Nanocl 日志中的错误。
- 确保防火墙允许 UDP 51820 端口流量。
- 验证配置路径存在且可写。
- 用
nanocl ps和nanocl cargo list --namespace your_namespace检查运行实例。
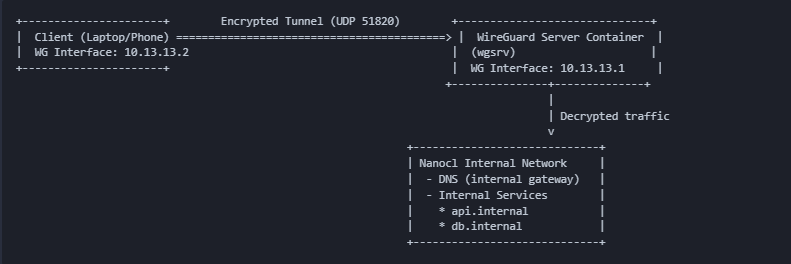
查看部署示意图
后续步骤
完成了!你现在拥有自己的高性能 VPN 服务器。可以将指南分享给朋友,发布你的成功经验,帮助更多人掌控隐私。
最后更新于